Introduction
Welcome to the wonderful world of designing pixel art for VZones! This creation guide will give you a step-by-step process on how to design objects, accessories, clothing, heads, and bodies for use in WorldsAway, the world environment of VZones. Let's begin with our tools of the trade!
First, you can secure nearly everything you'll need to start your designing adventure by downloading the VZones Art Programme Package. Simply unpack its contents onto your computer desktop or anywhere convenient for you to explore.
Inside the folder, you'll find:
· VZones Art Creation Guide – A handy offline copy of the guide, which you may be reading now!
· VZones Art Templates – Layouts for creating various types of art featured in this guide.
· VZones Art Palettes – A full set of palette formats for design software compatible with VZones.
· Kenn's Painter – Software for testing repaintable colours by one of the legends of WorldsAway.
· Aseprite – An authorised free version of one of the best pixel art apps around!
With all of the
supporting materials at your disposal, you're ready to launch your preferred
application for creating pixel art. If you don't have art design software
of your choosing and Aseprite
doesn't mesh with your creating style, don't worry. We have you covered.
Read on!
Table of Contents
Outlining, Colouring, and Shading Accessories
Outlining, Colouring, and Shading Heads
Outlining, Colouring, and Shading Bodies
Animating Bodies: Gestures and Passive Actions
Recommended Software
To create art for VZones, you will need one of several compatible graphics editors. This guide will show you the step-by-step design process using GIMP, but you can use any of the alternatives below.
GIMP
Comparable to Photoshop, this official design application of the VZones Art Programme is free to download and use. It is your all-in-one software for anything you could hope to create for VZones.
Photoshop
Adobe's classic photo editor is the longest-running supported design software for VZones. Many artists consider it their medium of choice.
http://www.adobe.com/products/photoshop.html
Paint Shop Pro
Older versions of this software are preferred by some to be more suited for pixel design compared to Photoshop.
Aseprite
This sprite design tool is an excellent alternative to extensive painting software. An older build under a free license is included in the VZones Art Programme Package, but the latest version is inexpensive.
GraphicsGale
Much like Aseprite, this freeware excels in sprite creation options without the bloat of some other design software.
Pixly
This gem is quite possibly the best free sprite creation tool for Android devices. Its developer has many plans for the app, such as support for Aseprite and PSD importing.
http://pixly.meltinglogic.com/
Pixaki
This low-cost app may be one of the best sprite designers for iPad. It supports PSD importing and various palette formats.
Environment Setup
Before starting your design, the environment should be set up to meet the art processing requirements. Included in the VZones Art Programme Package are templates and palettes files that can be imported into your designing software. In those templates, the Layered Canvas and Resolution are set in advance for you.
Layered Canvas
Working with layers is recommended for keeping track of key elements of your design or lining them up with a model or reference. The included templates have reference layers already in place, so you should use them.
When starting from a template, keep the file format the same to work on your art without losing your layers, but be sure to save with a different file name! You should only start a project from a blank canvas if you are experienced in designing for VZones and need a special setup. In such an event, you will want to save in a format that allows for individual layers, which is usually the default format for the application.
In GIMP, you should load an XCF template based on the design type you wish to create, saving as a separate file in the same format. If you prefer to start from scratch, you can set up a new canvas from File > New. Resolution options are found in the Advanced Options, which you can change to match the details found in the following alternative resolution adjustment method.
Resolution
To process art properly, the resolution for your canvas must be 72ppi (pixels per inch). If your graphics software of choice does not support a change of resolution, simply note this when submitting your design and the processor can convert the art for you.
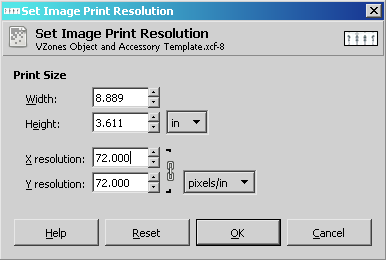
GIMP has full support for resolution change. With an already-open project, simply select Image from the main menu and click Print Size… to access configurations for image print dimensions and resolution. Make sure that pixels/in is selected in the lower option box and change both the X resolution and Y resolution to 72.000.
Palette
VZones uses a universal, fixed palette through an indexed, 256-colour mode. All recommended software support importing of the official VZones Art Palette in GIMP Palette (*.GPL), Photoshop Palette (*.ACT), and/or Paint Shop Pro Palette (*.PAL) formats. The Photoshop Swatch (*.ACO) file is for quick access to the colours in the palette while creating in Photoshop. Unless you're working with GIMP or without layers, switching to indexed mode is not recommended while designing because the conversion tends to merge all layers.
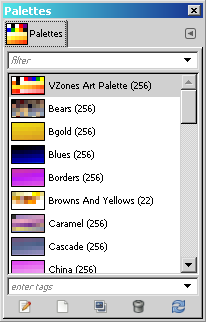
To import the official VZones Art Palette in GIMP, go to Windows > Dockable Dialogs > Palettes from the main menu bar. With the Palettes window open, tap the small box on the upper-right corner depicting an arrow pointing to the left to bring forth a drop-down menu. Navigate to Palettes Menu > Import Palette… to open a new window with importing options.
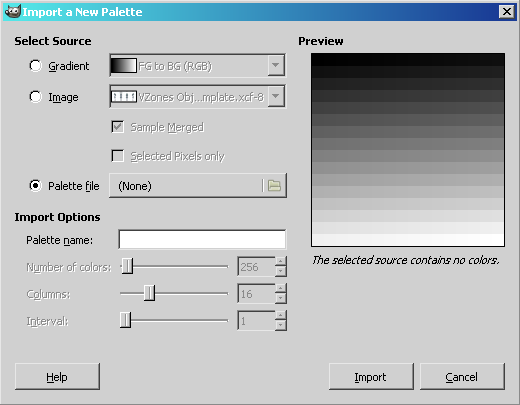
In this new window, tick the radio button next to Palette file and press the folder bar to the right of it to launch a window where you can locate VZones Art Palette.gpl to import. This permanently loads the palette into GIMP's resources for future use.
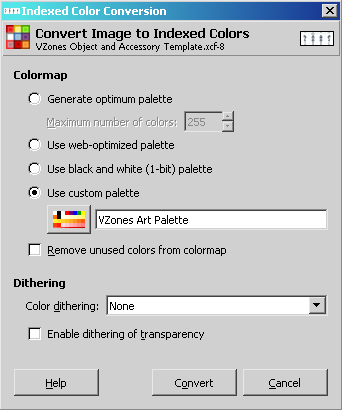
Now that you have the VZones Art Palette installed, you will want to apply it to your canvas. Do this by going to Image > Mode > Indexed… from the top menu bar.
The conversion dialogue box that opens will allow you to apply your newly-installed palette by ticking the Use custom palette radio button and clicking the image to select VZones Art Palette from the list. Before converting, be sure that all of the configurations match that of the image below.
Finally, direct your cursor to Windows > Dockable Dialogs > Colormap to access a complete colour table. Each tile is assigned individual index numbers, similar to swatches in Photoshop.

You can select any of the swatches to paint, but be sure to check the Interpreting the Swatches section of the General Design tutorial for details on special colours.
Brush
In general, you should draw using a single pixel brush with full opacity and no feathering or anti-alias. You can use a larger brush, but make sure the colour is solid with no variations when painting.
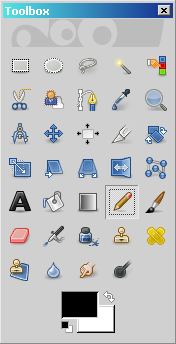
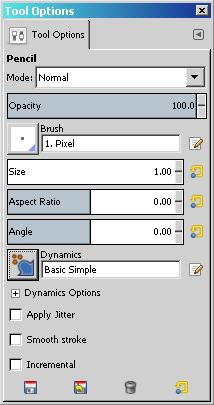
Your main pixel-generating tool in GIMP will be the Pencil. Access it using the Toolbox. In the Tool Options, adjust the Opacity, Brush, Size, and Dynamics to match that of the settings as shown.
|
|
|
By default, the Toolbox and Tool Options are present as a combined dockable dialog. If this is missing, either combined or separated, you can restore them individually from Windows > Dockable Dialogs, selecting whichever windows are missing afterward.
With your environment set up, you can
begin creating a number of different elements for WorldsAway. Among these
are basic objects, animated knickknacks, accessories, clothes, heads, and even
ambitious bodies.
General Design
Several types of art exist within WorldsAway. For each category, general design principles apply. This tutorial and the following specialised tutorials should be applicable when using any of the recommended design software. If you need help navigating GIMP for basic tools, some great guides exist on the Internet. Let's get started!
Mastering the Template
The first step is becoming familiar with your template. Each template has unique arrangements, but for general design, we will use the VZones Object and Accessory Template, ideal for simple objects to be held, decorations, and furniture. For creating accessories, heads, and bodies, please refer to the subsequent tutorials.
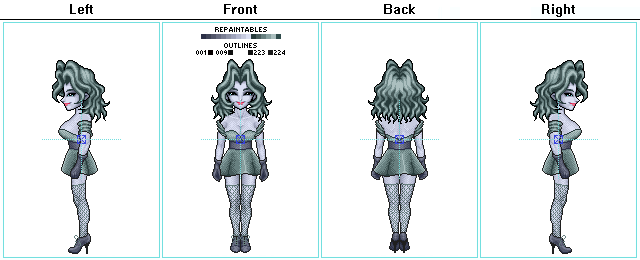
When creating objects using the above template, be sure to design in the Object layer. The Model elements are arranged in such a way as to emulate how your object would look when held in WorldsAway. The Accessory layers are used for designing accessories, which are covered in the tutorial that follows; they should be turned off when creating object files. The Anchor Points, which resemble blue and aqua mil-dot crosshairs, are reference points to determine how an object attaches to a head or body. These are for processors to use when they design, so in most cases, you will want that layer to be off at all times. The Palette contains quick reference for special colours, which are covered in the next step. You can use an eyedropper tool to sample the colours on this layer at any point. More layers can be added when needed.
If the size or complexity of your design requires more space than provided, simply expand your canvas and move the elements of each layer of the template. Unless your design requires a constant model reference, you can turn off the unused layers after determining the envisioned object's overall size. However, you may want to restore the layers after designing to show how the art interacts with avatars.
Interpreting the Swatches
The second step is to learn the details of the colours at your disposal. The image below is the standard layout of the swatches, but the grid may differ for you, depending on which software you are using.
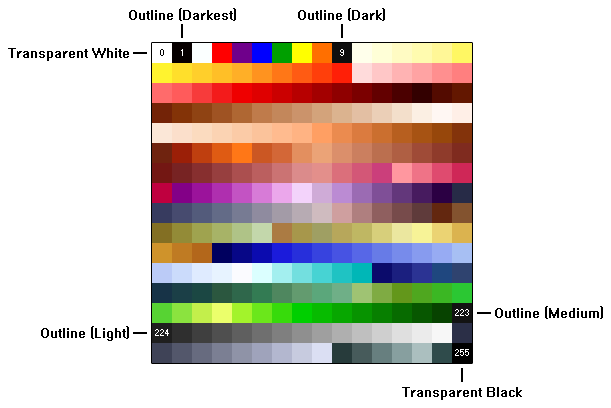
While most of the swatches above are valid for use in your design, some details should be noted about the following special colours:
· Transparencies – The upper-left white swatch (index 0) and the lower-right black swatch (index 255) are set to transparent (alpha) in the VZones environment. Use them only for negative space and notes for your art.
· Outlines – The black (index 9) to the right of the orange in the top row is used for general outlines, but you are not required to use this specific black. The two darkest shades (indices 223 and 224) of the greyscale sequence are also acceptable. In special cases for dark art, the black (index 1) next to the corner white works. Just be consistent with each separate design.
· Repaintables – Colour indices 239 through 254 (the dark slate grey right of the very light grey in the second-to-bottom row to the desaturated dark green left of the bottom-right black) are reserved for colour-replacing. In the VZones environment, these 16 colours can be assigned any other valid colour in the table, allowing for customisation of the art in world. Read on to understand more about how to use these repaintables when colouring and shading.
![]()
Outlining
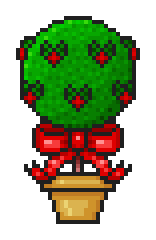
Objects held by avatars, some furniture, many large accessories, heads, and bodies all have outlines. Recessive background art omit all outlines. However, with some distinct foreground decorations, outlines are present. You should keep all outlines to a single pixel width and as clean as possible. To see this in practice, let's look at the Magic Berry Topiary, a little potted shrub originally designed for Christmastime.
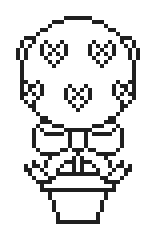
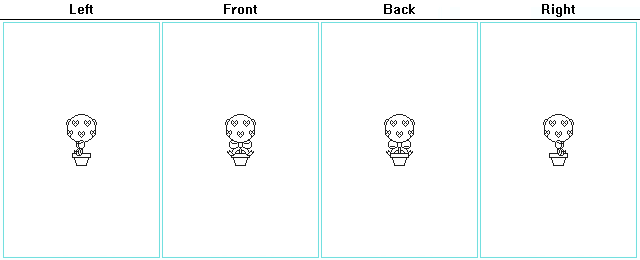
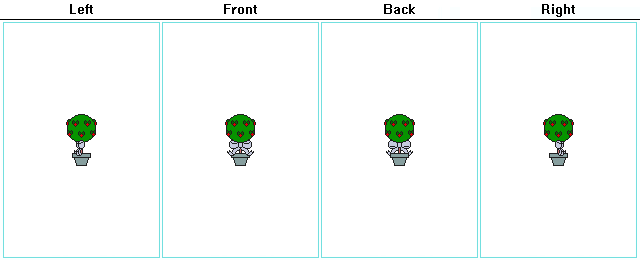
As you can see, the outline is simple and clean with no unnecessary pixels. This method should be applied to each of the four orientations. In many cases, the right view is a mirror copy of the left view. If any views of your design copies or mirrors another, adding an isolated text note in the related view instead of copying or mirroring images can be helpful for processing. The topiary in the image below will show exclusive views in its completed form.
Colouring
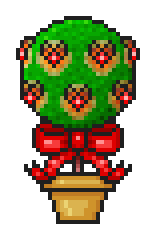
A typical strategy when colouring is to paint each element as solid colour before shading. During this stage, you may want to consider making use of the aforementioned repaintable colours. Such customisability aids in making your design versatile in WorldsAway, increasing its potential popularity. For basic objects and accessories, these customisable colours are not subdivided.
![]()
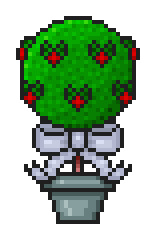
While the original Magic Berry Topiary was released with a red bow and a terra cotta pot—later revised to feature a golden ceramic pot—making elements like these repaintable would be beneficial. Presented here is a repaintable version of the design.
Shading
Shading techniques differ from artist to artist, but art shown in WorldsAway is typically smooth with no cartoon cel-shading. When using repaintable colours on basic objects and accessories, try to limit any single element of your design to no more than 8 shades of an intended hue to make painting the design in WorldsAway more practical. Many times when an object calls for more levels of shading, a technique called dithering is applied to give an object smoother transition between shades. However, when shading dots are added unevenly throughout, they can give the art surface texture, like seen with the topiary's foliage.
Animation
Numerous items in WorldsAway feature short animation sequences. Although optional, animating your design can add a lot of appeal.
Four types of animation modes exist in the VZones environment:
· Continuous – The design is always animated in this state with no interaction from the user. Almost all art types can feature this animation style, including objects, accessories, and heads.
· Activated – The animation plays once when the user selects a triggering option on the item. This style typically is limited to handheld knickknacks and decorations.
· Toggled – When turned on, the design switches to a continuous animation or a different stationary state. It can then be turned off to return to the inactive state. Any object or accessory can feature this status change.
· Mood-Dependent – Typically associated with heads, one continuous animation plays for each of the four moods. Objects held by the user and accessories can react to mood changes, too.
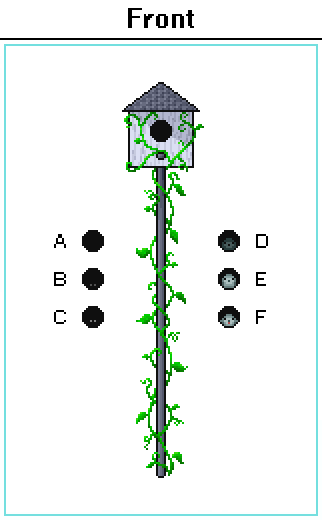
To add animation to your design, include each unique frame into its respective view. If only a small portion of your design concept has animation potential, you can isolate that element from the main design. Processors are able to layer art much like animation cels in cartoons, so the shared space need not be cut. You can include transparent black (index 255) text labels next to each sprite as frame numbers or IDs for personal reference or processing aid. Both of these practices can be seen in the sprite sheet of the Classic Birdhouse, which was redesigned with a little bird that peeks out of the opening repeatedly when the item is turned on.
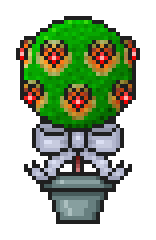
Returning to the Magic Berry Topiary, we can see that the finished design takes advantage of toggled animation by having the little berries glow when turned on. The difference is subtle, but it adds a nice dynamic touch to the already cute design.
With all of the art completed for the four views and with two settings each, the Magic Berry Topiary looks like the following very basic sprite sheet.
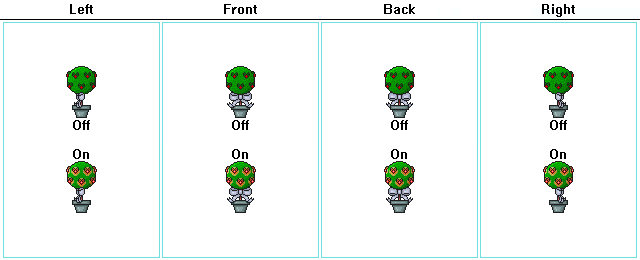
After the art is processed, an item like this could be repainted in WorldsAway with a harmony of hues, as demonstrated by the most recent colour scheme imagined for the Magic Berry Topiary.
|
|
|
Your
finished design may be as simple as a single sprite with only one unique view
and no animation, or as elaborate as an expansive sprite sheet with four unique
views and a few seconds of animation. The complexity of your art is up to
you, so create whatever your heart desires!
Accessories and Clothing
Avatars love to accessorise. Up to three accessories can be worn on a head, one for each of the three different slots. This includes clothing worn on the body!
Just like with basic objects, everything worn on an avatar's head can be created using the VZones Object and Accessory Template. The Accessory (Head), Accessory (Eyes/Nose/Ears), and Accessory (Mouth/Neck) layer placements help to give an idea how the different accessory types will interact with the head and body. The template comes with the Party Girl dress as example clothing.

Accessories can be attached to any of the following head slots:
· Head – Hats, helmets, headpieces, and anything worn directly on the top of the head.
· Eyes/Nose/Ears – Glasses, earrings, masks, and other mid-face accessories.
· Mouth/Neck – Neckwear, beards, and especially body clothing.
Outlining, Colouring, and Shading Accessories
Generally speaking, all articles of clothing worn on the body tend to have outlines, but some smaller accessories—such as jewellery—do not. Consider aesthetics when choosing whether or not to use an outline for worn items.
Most accessories should use repaintable colours, especially clothing. Just follow the Colouring instructions in General Design section for further details on how to use them. Body clothing is the exception, so keep reading on how to utilise repaintable colours with such garments.
Shading style can vary for accessories, but the shading for clothing should be dithered to some degree to give a natural look. This can be seen in the image above.
Accessory Spacing
Some accessories have spacing requirements to fit heads correctly. Earrings must be 27, 29, or preferably 31 pixels apart, encompassing the centremost pixels when measuring. Similarly, necklaces and chokers should be designed with their chains at a minimum of 15 pixels apart when wrapping around the neck.
Clothing
With clothes that cover the body, you want to follow the contours of the model featured in the template. Expanding outside of the body is fine, but be sure not to draw the outline into the body unless intended.
Be cautious as to how far down your outfit follows the body curves. Accommodating for leg movement is important as not to have the legs clip through the outfit, especially in the side view. Likewise, clothing cannot have long sleeves, because they will not conform to the avatar's arm movements.
For clothes that show a little top skin, a custom bust is commonly built into the design. The model in the template wears the Party Girl dress by default. Isolating the outfit, you can see how the custom bust was made.
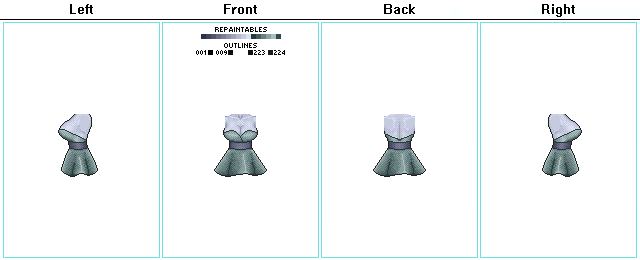
When including a custom bust, it should follow the model body contours closely and must have the repaintable skin colours so that they can match the avatars wearing the clothing. This arrangement of the repaintable colours is used for creating bodies, too.

Animating Accessories
All accessories can be
animated. Clothes usually do not feature animation, but jewellery could benefit
from a sparkling effect. You may want to design any sparkles on a
separate layer from the main accessory design. Feel free to give any
accessory that extra pizzazz!
Heads
Heads are worn on otherwise headless bodies. They feature four unique moods and can hold up to three different accessory types simultaneously. The VZones Head Template can be very useful for determining the average proportions and placement for eyes, nose, and mouth.
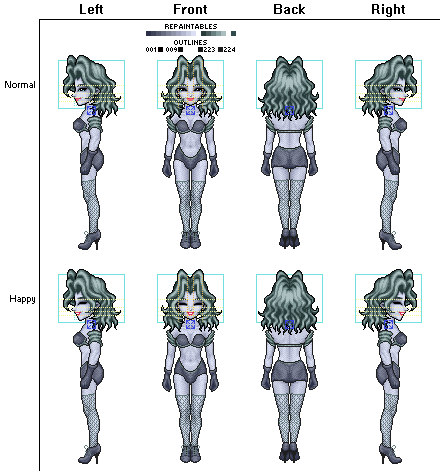
When using this template, be sure to create your head in the Head layer and use the model head only for reference. The Bounding Boxes determine average dimensions of head—inner for faces and outer for hair—but you can extend beyond these limits, especially if your head sports long hair. The Guides are dotted lines that assist with the placement of facial features. The Anchor Points, which resemble blue crosshairs, are reference points to determine how the head attaches to a body. These are for processors to use when they design, so in most cases, you will want that layer to be off. The model body is sufficient to demonstrate how the head should fit.
Heads can be human, animal, or even based on inanimate objects. They are somewhat realistically-proportioned, but a style inspired by anime is acceptable. Stick to the general face size for heads unless there's a key reason why the head being designed must be significantly larger or smaller.
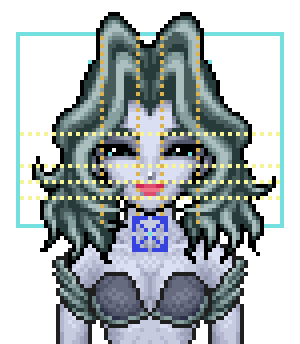
The four moods associated with heads are as follows:
· Normal – The default mood, usually relaxed or smiling mildly.
· Happy – Also called Glad. Shown as an apparent grin or joyous expression.
· Sad – Looks generally unhappy look, but can be seen crying.
· Mad – Overall an angered appearance, either subtle or obvious.
Usually the back view is the same for all moods, but some elements of the head could reflect the different dispositions.
Outlining, Colouring, and Shading Heads
While all heads should include outlines overall, outline can be omitted at the flesh connection point with the neck for the side views and sometimes the back view when appropriate.
Using all 16 of the repaintable colours on a head design is greatly encouraged for depth and customisability. The first ten colours typically are reserved for the Face, the next five are for the Hair, and the final colour is for the Eyes.

The face should have smooth shading to suit the environment, avoiding any cel-shading found in cartoons or anime. The hair sometimes can have dithering, but it is not required.
Animating Heads
Like most art types, heads can be
animated. Perhaps the most fitting animation for heads is periodic
blinking, which has increased in popularity over the years. The sky's the
limit, but sometimes less is more. Exercise your creativity!
Bodies
Bodies are the most ambitious of the art categories, but they can be very rewarding, since they usually are offered indefinitely and they are the bases of all avatar customisation. Each body has unique art animation sequences for different actions—16, to be exact! The Body Layout Template can assist with keeping all of the body elements grouped for each action.
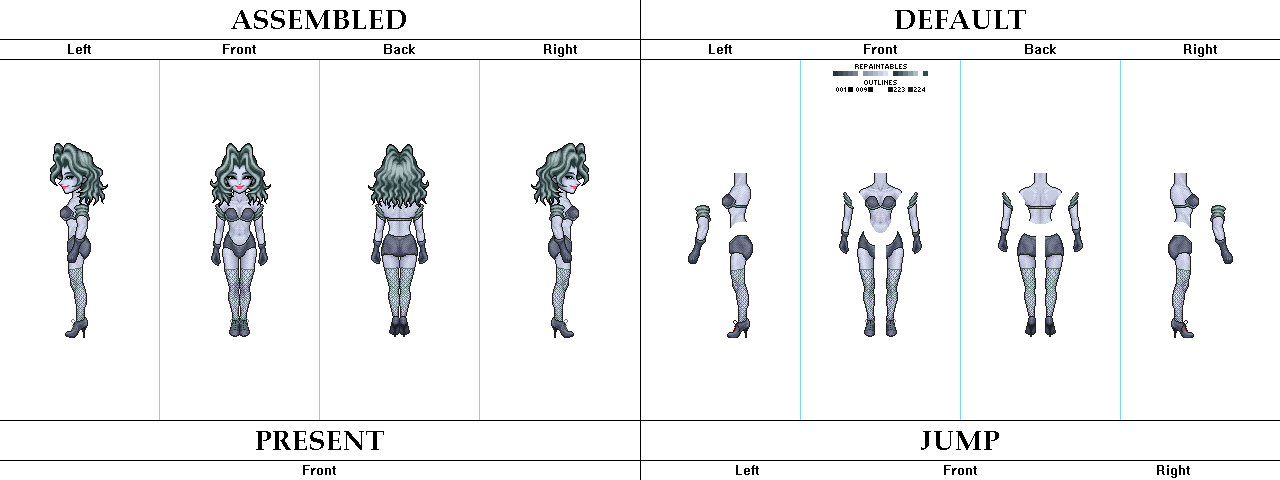
Here is a breakdown of the actions associated with bodies and which of the four views are used:
· Default – The basic standing appearance. (All Views)
· Wave – Waving a hand in greeting or farewell. (All but Back)
· Bow – Taking a bow. (All but Back)
· Shrug – Shrugging with hands raised a little. (Front Only)
· Present – Gesturing with a hand to the side to show something next to the avatar. (Front Only)
· Jump – Jumping up into the air and landing again. (All but Back)
· React – Twitching from a giggle, scratching, or doing some other quirky action. (All but Back)
· Sit – Taking a seat on a chair or other seating. (All but Back)
· Sitting Wave – Waving while sitting. (All but Back)
· Pay – Paying for an item with arm stretched forward. (All but Back)
· Receive – Extending a hand to receive an item, typically with palm facing up. (All but Back)
· Hands to Head – Lifting hands to the head level for wearing and removing heads. (All but Back)
· Walk (Short Stride) – Walking with a short stride. (All Views)
· Walk (Medium Stride) – Walking with a medium stride. (All Views)
· Walk (Long Stride) – Walking with a long stride. (All Views)
· Double Click – Performing a short dance or showing off a skill. (Front Only)
The Body Parts layer is included for you to begin creating your body. A Head layer is present as reference to complete the look for the otherwise headless body. The strategy with building bodies is to have a layer or multiple layers with individual body parts. The standard five parts include the torso, arms, and legs. Studying how other bodies work can be a great help in the design process.
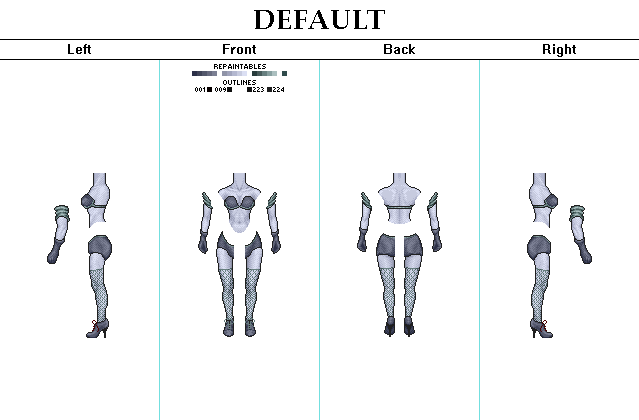
Here are some design tips:
· Create and place parts in actions only when they are unique, such as an isolated arm sequence for waving.
· Design a left view but put a note that the right side is mirrored instead of mirroring the resources, unless your body is asymmetric.
· Create a duplicate layer and assemble your parts for every action.
Outlining, Colouring, and Shading Bodies
All bodies should have outlines, but the cut at the neck omits the outline, as demonstrated with the model in the template. When creating an outline, consider how the assembled product will look.
When designing a body, always make use of the repaintable colours for customisation. They are subdivided into four groups, three of which can be painted separately by avatars in WorldsAway.

The first five colours are assigned to the Lower element of the body, such as trousers, a skirt, or leggings. The five repaintables that follow typically are reserved for the Skin, although fur, scales, or feathers are not out of the question. The five subsequent colours typically represent the Upper part of the body, such as a shirt or other top, but sometimes bodies use this for special shoes or other body elements. The final colour is a special Accent not commonly used with existing bodies and members are unable to paint this element without assistance from staff as of the version of this guide. This feature will be paintable by members in the future.
Shading bodies almost always involves dithering, as shown with the model body. Some smaller elements need not be dithered. Analyse the model to understand how to shade the body parts properly.
Body Proportions and Spacing
The height of a humanoid body can vary, although the provided model is a good estimate. The neck width should be a consistent 13 pixels wide, including the outline.
Keep body parts spaced out a little. You know that they're far enough apart when you can easily draw around each of them with a mouse.
When assembled, body parts can overlap. However, each should have indication on how they should mesh with each other, such as defined cuts (like a jigsaw puzzle piece) or distinctly shared pixels.
Animating Bodies: Gestures and Passive Actions
Gestures are single-run animations triggered from a menu option or an emoji. The same general principle applies for passive actions such as interactions with the environment. Most of these actions contain only two or three unique frames played in a sequence forward and then those same frames repeated in reverse. However, some actions could consist of several unique frames to portray a skill exclusive to that body.
An example of a simple action would be waving. Typically, to make an avatar wave, a single transitional frame is created to serve as the raising and lowering of the arm. This is followed by two alternating frames with the arm at peak elevation to give the illusion of waving. Some bodies use more frames to accomplish the greeting/farewell gesture.
Perhaps the most complex action is the double click. Each body displays a signature move with no standardised set of frames. Examples include dancing, flapping arms while floating, and posing.
You can take creative liberties with some of the gestures, such as a curtsey instead of a bow. The differences can make a body interesting and memorable.
Animating Bodies: Walking
The walking cycles are pretty standard for all bodies. Avatars exercise short, medium, and long strides. Each pacing uses four frames of animation for the left leg, and then again the right leg. This arrangement applies to each view, although the side views need not be unique. In addition, consider the first frame as not only part of the natural walk cycle, but also as the first step from a standing position. Likewise, the final frame should transition to the first frame but also look good when coming to a standing halt.
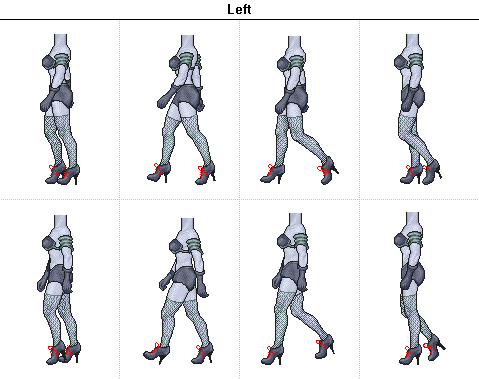
Much like with gestures, you can replace walking with a different movement animation, such as flying with fluttering wings. Just keep the standard eight frames in mind when exploring alternatives.
With all of these actions, creating
an animated GIF
from your assembled parts for each is essential. An explanation on how to
do so is in the next section. We salute you, body designers!
Exporting and Submission
After completing your design, you normally need to export two flattened versions of your layout. These images then are added to a new package along with documentation and any supporting files for submission and review. Be sure to save backup of your layered image or work file before continuing.
Exporting
First, turn off any references layers except the Background layer. This will isolate your design on the sectioned canvas. Be sure to apply the indexed VZones Art Palette with nearest colour settings and no dithering if you have not done so already. Doing so will flatten the image in some graphics programs. The next step should be followed only if your design includes repaintable colours. Otherwise, skip the following paragraph.
Save or export your image in BMP format. Next, launch Kenn's Painter, which is included with the VZones Art Programme Package. This handy app allows you to test the repaintable colours in your design. In the program, go to File > Load Other Bitmap and locate your image. Fill each slot in the groups to the right by dragging any of the colours into them or just use colour codes (16 consecutive indices) in the bottom field. Check if the colours affect all of the repaintable elements of your design. Magnifying the image by marking the Enlarge tick box can be helpful. Saving the result is unnecessary.
If all looks well with your design, save or export the image in your design software as a PNG file. In GIMP, you can export by selecting File > Export As… from the main menu and clicking Save File Type (By Extension) in the Export Image window. Use default settings.
With most types of art, excluding background elements, you should prepare the second version of your layout by using the layered image. To do this, turn on all layers, but leave the Anchor Points off (unless you are a processor). Adjust or assemble your design to interact with the model as intended, such as being held in her hand or worn by her. Save or export this image as a PNG file.
If your design concept features animation, you need to create at least one animated GIF file to demonstrate how the art should look when implemented. While GIMP can accomplish this, Aseprite is a better option. You can find this sprite design software in VZones Art Programme Package. The following instructions will educate you on how to use Aseprite for creating animated GIFs. If this does not apply to your design, you can jump straight to the submission details.
Open the PNG file of your isolated design by selecting File > Open from the main menu. Next, tap the Rectangular Marquee Tool at the top of the tool list on the far right.
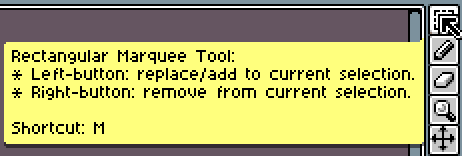
Encompass a single sprite with enough space around it to accommodate for the area size required for other frames in your design. Copy this selection and then go to File > New to start a fresh palette with the canvas matching that of the selection currently on your clipboard. Next, click on the rightmost button above the palette. From that drop-down Options menu, select Load Palette.

You can choose a compatible VZones Art Palette or simply pick the PNG that you opened before. Paste your cropped sprite and prepare to do the same for new frames. The official web site for Aseprite has an excellent tutorial on how to create animation from this point forward.
https://www.aseprite.org/docs/animation/
Please note that the VZones environment runs at approximately 12 frames per second. As such, the duration of frames should be in multiples of 80 milliseconds.
Submission
Once you have exported all of your files, you should verify that the sprite sheet without reference layers meets the requirements to the best of your software's ability. After this, you should include documentation about your design for the submission package, as explained below.
Make sure your sprite sheet has these properties:
· Indexed with VZones Art Palette
· 72ppi resolution
· PNG format
Write the following information in a text document:
· Legal name
· Avatar name
· Artist initials (public)
· Name of design
· Whether you are selling or donating your design
· Any notes to aid in the implementation process
Add the files in this list to a new ZIP archive with one set per design:
· Documentation
· Design sprite sheet with no model elements
· Model display showing how design is held/worn (excluding background objects)
· Animated GIFs (animated designs only)
Once everything is prepared, please upload your package. A representative will verify if your design is approved or provide feedback if further changes are required. If you have any questions, please submit a Support Ticket or post in the VZones Art Forum.
Thank you for participating in the
VZones Art Programme. We look forward to seeing your designs!
Glossary
Alpha
The pure black and white colours that the world interprets as full transparency.
Anchor Point
Reference points that indicate how the associated art lines up with a head, body, or object.
Avatar
The character representation of the members In the VZones world environment.
Bounding Box
A rectangle that is expected to enclose certain elements of art, especially the face and hair for heads.
Default Colours
See Repaintable Colours.
Dreamscape
The original world environment of VZones, mythological region of the Island of Kymer.
Knickknack
Object that an avatar can hold or use.
newHorizone
A region of the world environment known for its landmarks based on real world cities.
Processing
The procedure of converting raw art into the final format that is seen the VZones world environment.
Repaintable Colours
A set of colours applied to raw art to allow designs to be changed to other colours within the world.
Swatch
A specific colour sample within the palette.
Tab
A processing term for Anchor Point.
WorldsAway
The world environment and original name for VZones technology.

